JellyPages.com

Sunday, January 30, 2011

Tidbitz In Time February kit reveal!!

Have a look at "Take Me Away"...


This beautiful kit is perfect for Valentine's Day, vintage, and heritage projects! It is also an incredible value with all the embellishments. The embellishment and flower packages are complete, not broken up into pieces like you might see in other kit clubs. Here are my projects for February:


A treat bag, ready to be filled with chocolates and given to a special someone!


A pretty way to store my fabric bits. This makes me want to play!


If you like what you see, hurry on over to Tidbitz In Time and get your kit right now before they are gone!

Saturday, January 29, 2011

Printing and painting photographs on canvas...

This is something I have wanted to do for a long time. I love canvas and have seen photos printed directly onto it before. I decided it was time to try it out! I started with the following:


*photo printer paper
*canvas
*Glue Arts FabricBond cartridge/ GlueGlider Pro
*clear acrylic sealant spray
*Creative Inspirations paints
*large paint brush, scissors

Step 1: Trace your photo paper onto a piece of canvas, and cut out. Try not to fray the edges as you go.


Step 2: Now adhere the canvas onto the photo paper. Place a few strips of FabricBond onto the bottom edge of the paper. Line up your canvas edge as evenly as you possibly can. Add more strips of adhesive on the rest of the paper, and flatten your canvas down onto it.


Step 3: Now smooth out the canvas, and go over it briskly with a brush. You are trying to get as many fluffy fiber bits off of the surface as possible. Spray your canvas liberally with acrylic sealant. This also helps control loosened threads as it feeds through the printer.


Step 4: Let your canvas dry for at least thirty minutes or so before printing on it. When it comes out, you'll have something like this:


At this point I seal it again and allow it to dry...

Step 5: Time to paint! Use water to clean your brushes out between colors, but dry them well. Excess water will turn your black ink a sickly green.


This seems like it's time consuming, but it really isn't bad and I found it very fun! Is it something you might try?

Here's the page I used the photo on:


Wednesday, January 26, 2011

Blog TRUFFLE alert!!

What the frig is a "blog truffle"? Is that what you're wondering right now? LOL! Well, that is what we at Creative Inspirations like to call blog candy because we think giving away FIVE jars of our paint is better than plain old candy! Are we right? Of course! Just look how pretty they are:


So what do you have to do to be in the running for FIVE jars of fabulous, shimmery paints in the colors of YOUR choosing? It's very simple. We just want you to answer a few questions, and follow our blog. Here is the post you want to comment on. You have until February 7th, and the winner will be announced on February 9th. You don't want to miss out on this chance to win!

Friday, January 14, 2011

Tidbitz In Time sneak peeks!

When I received the February Tidbitz In Time kit that Wendy put together, I was completely floored. Not only is it beautiful, but I have to say I don't think I have ever seen a kit packed with so many spectacular embellishments. REALLY. The papers are just gorgeous too! This kit is perfect to use for February's biggest holiday: Valentines Day. BUT, it is also perfect for scrapping old family photos. I think you will love it as much as I do, and I want to share a few small sneaks with you:


Beautiful, right? Check back on January 30th when I will have the full reveal and a link for you to get one of these babies for yourself!

Tuesday, January 11, 2011

Art from her heart..........

Like mom's everywhere I am slowly being buried by the artwork of my children. Drawings, paintings, love notes, scrapbook pages... The list goes on and on. I want to keep everything they make, but that is just not possible. My daughter alone would have a few large boxes full of stuff in just a few more years. While it will be difficult, I have come to the conclusion that I must only keep a select few examples of her creativity. Not wanting to put these pieces in a box to be pushed to the back of the closet, I decided an album would be a great idea for storage. The plan was to use paper bags which could be filled with artwork over the years. I was thinking that having the album made right now would force me to keep her things in one place and remember to get examples from every age. I am hoping I can collect things all the way through high school. I am imaging how amazing this will be to look though when she has moved on to start her own life!

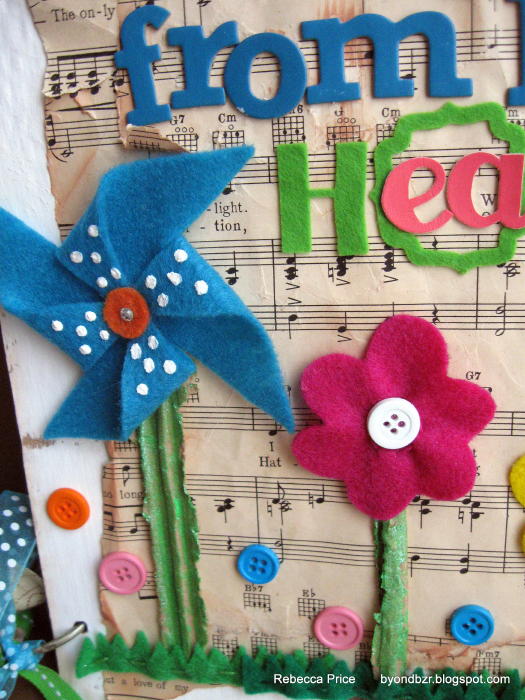
I started out with cardboard, chipboard, paper bags, and paint. After everything was painted and dry, I punched holes through everything and put on the jump rings. Decorating the front was fun, I went with my grandmother's old sheet music and the "One Fine Day" set from Wendy Hammer Designs. Isn't the pinwheel awesome! The stems are cardboard that I painted with Fresh Green paint from Creative Inspirations.


I have to say, I love this so much! Rylie loved it too and it inspired her to make me a "love" book. She drew pictures of me and her, and glued several pages together. It is so sweet, and definitely a keeper, so that is the little rolled scroll already in her album! Next task: To make one for Mason's art!

So, what do you think? Do you like this idea, and will you try something like it?

**OH, I forgot to mention the size of it! It is 8.5 x 11, so I will be keeping small creations, or rolling them up. I can always make the album wider with larger jump rings.**

Saturday, January 8, 2011

Progress: Erosion bundle project...

In December I joined in the Erosion Bundle craze. This post shows the bundle I made. Well, I couldn't help myself and made another just a few days after that! Every few days I head to my backyard and check them out. I was ecstatic the first time they got soaked with rain! Today we have a beautiful fresh snow and I couldn't resist snapping a few pics of my bundles. You can already see a bit of discoloration on the outside fabrics!


The fabric on my second bundle, which mainly holds fabrics and metal so I can get some rust action, is really getting good spots of discoloration.


See the bit of discoloration over the starfish? YAY!


Sooo, have you made your bundle yet? I recommend it!

Friday, January 7, 2011

Creating for friends..

Have you seen the "Pay it forward 2011" posts on Facebook? You have to send something handmade to the first five people who respond if you make it your status. Here is the status, if you haven't seen it yet:

"Pay it forward 2011.... I promise to make something handmade and send to the first five people who comment. They must in turn post this and make something for the first five who comment on their status. *The rules are it has to be handmade by you, and they must receive it before 2011 ends."

Well, I ended up with six people and I couldn't turn anyone away! Today I decided to get a start on some flower sets for them, and I am seriously going to have a hard time parting with these! Have a lookie:


Made with a corkboard base, mesh, organza, and metal numbers...


Made with a cardboard base, printed fabric that really reminds me of "Little House On the Prairie", remnants of an old sweater, and pearl beads...


And these were made with canvas that has been my misting mat/drop cloth of sorts. I've misted so many items on this piece of fabric, it is very beautifully colored. I decided I'd sacrifice it now for flower making. I topped them off with plastic alpha beads...

These were fun to make, and took me very little time. I am happy to say I've got three down, three to go for this RAK! Do you think they will like them?? They are my friends and know my obsession with texture, so I think I'm OK, lol!